[rant]The delete key. Friend of everyone who ever wants to edit and fix everything. Well, in OpenOffice.org's Calc, it's broke. I'm sorry, it's just not right. I cannot even imagine how someone as savvy as the programmer who came up with this could also fail to see the implications of this broken thing for new users. [/rant]
What happens is that when using Calc, if the user hits the Delete key, a dialog shows up asking the user to select what elements of the cell are deleted - contents, style, borders, all, etc. A VERY useful idea. I cannot tell the number of times that little dialog would have been welcome when I was using Excel - don't want the cell border, but do want the contents? Easy to do and so much faster than having to go through the Cell Formating process to do it.
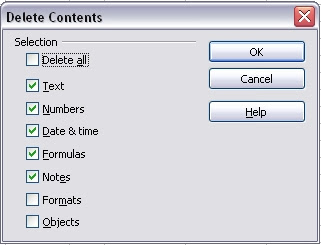
However, as useful as this is, NO ONE WILL EVER USE IT EVERY TIME and that's the real problem I have with it. I am used to using the Delete key to kill a cell and everything in it from my Excel days. Sure, I could use the Backspace key, where this functionality currently resides in OOo, but that takes time to learn and that annoys and frustrates new users. I want it in both places, but still want to be able to get that dialog for those special times when it's really handy.
So, here's how to fix the darn thing and make it work the way it should have from the very start. These come courtesy of "drensink," a user over at OOo's bug forum, though instead of swapping between Delete and Backspace, I use shift-Del to bring up the dialog. Thank you drensink!
NOTE: There are two "Delete Contents" talked about below - make sure you really follow the directions to add the correct one to the correct button.
Part One - Add the Dialog to Shift-Del
- Click "Tools" in the main menu
- Click "Customize" in the submenu
- Click the "Keyboard" Tab
- Set the radio button to "Calc" which should be the default
- In the Shortcut keys list scroll to and select "Shift-Delete"
- In the Functions Lists select "Edit" under Category and the second "Delete Contents" under Function
- Click the Modify Button
- In the Shortcut keys list scroll to and select "Delete"
- In the Functions Lists select "Edit" under Category and the first "Delete Contents" under Function
- Click the Modify Button
- Click the OK Button


